Polyglot R and Python Bioinformatics and Data Science Projects Using Jupyter Notebooks
Posted on Sun 02 June 2024 in how-to
TLDR - Check out this github repo for a (still really wordy) example: polyglot_jupyter_example
If you're anything like me, and there are probably tens of you out there, you enjoy working in multiple programming languages for your bioinformatics/data science work. Perhaps you love the tidyverse R ecosystem for data manipulation but prefer packages from a Python library like Scikit-learn. Or, as is becoming increasingly common, you're working on single-cell RNAseq analysis and you like normalization provided by Seurat, need to load data types only supported in the Python scverse, and want to use the Bioconductor SingleCellExperiment class to store your data.
If you're tried to use both Python and R in the same project maybe you've already realized that Jupyter notebooks and lab support many kernel types, including R. By installing the R Kernel in addition to the default ipython kernel you can use Jupyter for both R and Python notebooks, harmonizing your workflow across both languages. However, there is another consideration, having a reproducible environment.
Enter virtualenv and renv

![]()
Python virtual environments have been around for a very long time. They're a
great way to make sure that your package versions for a given project are
recorded, frozen, and don't conflict with those packages you're installed for
other projects. The standard library module venv
and the installable package virtualenv
allow you to manage them. I typically use pyenv
to install and manage python versions, and it has an extension for managing
virtual environments as well: pyenv-virtualenv.
Confusingly, pyenv-virtualenv actually uses venv (mostly).
On the R side of things, it seems virtual environments or project environments,
haven't had as much focus. Generally, packages are very backwards compatible in
R land. However, the package renv
is getting more attention. I think it's great for the R community. It's long
been commonplace to run sessionInfo() at the end of a notebook or script to
make sure you know which packages are in-use and their versions. Instead,
renv allows creating a project-specific library and tracks versions of all
packages used (though, you should still run sessionInfo() for in your
notebooks for completeness, I think).
There are lots of guides for Python virtual environments, but fewer at this
time for renv. It's pretty easy to start using though, just install it with
install.packages("renv"), restart R, initialize it in a directory for your project
renv::init(), install the packages you want, then update the lockfile with
renv::snapshot(). There are some quirks to it, so I recommend perusing the
docs.
The Goal: Use Both virtualenvs and renvs in Jupyter
I'm a big fan of Jupyter Lab, and I use it for most of my downstream analysis tasks in both R and Python. I use R more frequently despite liking Jupyter, which I guess makes me kind of weird. I'm not using R Studio (which is a great IDE for R too) because I want to use the same editor for notebooks in both languages. There are ways to use reproducible environments for both languages in Jupyter notebooks, so I thought "Why not find a configuration that allows the use of reproducible R and Python environments in the same project."
This required a bit of tweaking, but I'm fairly happy with the result. To do this you need to be a bit adventurous, but I promise it's not that hard.
Global Configuration
This has worked well for me in Ubuntu 22.04 (bare metal as well as WSL2) and Manjaro Linux.
- Install pyenv.
- Don't use your system python, especially on Linux, lots of the system can depend on it.
- Using the system python makes managing packages a nightmare.
- Install pyenv-virtualenv.
- Install the version of python you wish to use and set it as your global version.
- Make sure to use
--PYTHON_CONFIGURE_OPTS="--enable-sharedat a minimum. - The full command with pyenv that I use at the time of writing this is (you can use another
version if you wish):
env PYTHON_CONFIGURE_OPTS="--enable-shared --enable-optimizations --with-lto" PYTHON_CFLAGS='-march=native -mtune=native' pyenv install 3.12.3 pyenv global 3.12.3
- Make sure to use
- Install jupyterlab and any other Python packages you want.
pip install jupyterlab
- Install R using rig
- rig is optional but I really like it.
- Installing R from the CRAN repository is also perfectly reasonable.
- Install the R kernel for Jupyter.
- Follow the instructions in the R Kernel docs.
That gets you all the basics.
We are installing jupyter for the Global Python version. However, this global Python is not the system Python and is not used directly for any data science work, it's only for running jupyterlab.
Create Your Project Folder
I like to encapsulate each of my projects into a separate directory. This way, a series of computational notebooks that share a common theme can be tracked together with version control. Plus, a single environment can be used across notebooks used for a single project. This makes it easy to know which project notebooks belong to.
In this example I'm using polyglot_jupyter_example as the project name:
mkdir polyglot_jupyter_example
cd polyglot_jupyter_example
I then start jupyterlab in the project folder, or if you have a larger structure that encompasses many projects, in that higher-level directory:
jupyter lab
Set-up the Python virtualenv
- Make sure you're in the project/github repo directory.
- Set a version of python in the current project folder.
pyenv local 3.12.3
- Create a virtualenv, I just name them the same as the project.
pyenv virtualenv polyglot_jupyter_example
- Activate the virtualenv. You don't have to stay in the directory you made, but it keeps things simple.
pyenv activate polyglot_jupyter_example
- Install a minimal subset of packages needed for this example.
pip install ipykernel pandas seaborn
- Add the ipykernel you installed in the virtualenv to your jupyter that's outside the virtualenv.
python -m ipykernel install --user --name=polyglot_jupyter_example
- Exit the virtualenv
pyenv deactivate- Don't worry, jupyter will still know about it.
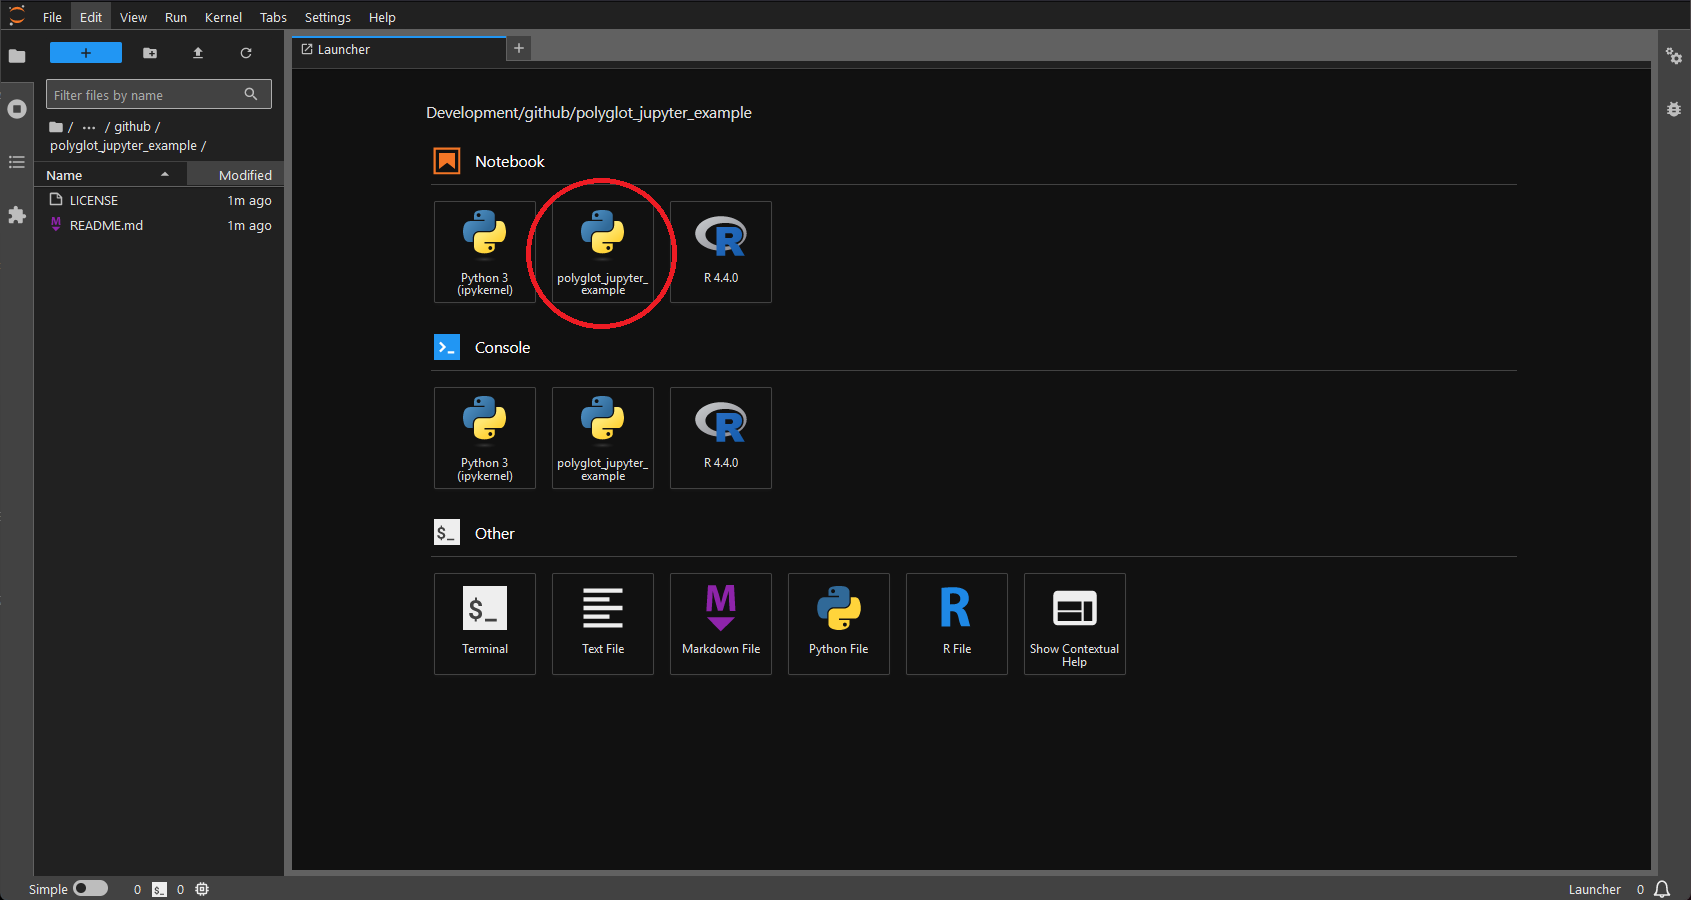
- Start jupyter and you'll see that you can now create notebooks inside the virtualenv.
Important Note: If you're used to installing pip packages, etc. within a
notebook by ! pip install {package} you'll need to adjust your workflow. The
shell that jupyter spawns does not know about your virtualenv. Just keep a terminal
open outside the notebook.
Set-up the Renv
This is somewhat easier, because R isn't controlling jupyter.
- Inside the project directory, start R.
R
- Install
renv.install.packages("renv")
- Restart the R session.
- Initialize an renv.
renv::init(bare = TRUE)bare = TRUEkeeps renv from parsing all text files in the project, if you're starting a project and it's not a blank slate (you have large notebooks and other files in it) this can cause renv to hang.- This creates a project-specific library, a
.Rprofile, andrenv.lockamongst other things.
- Exit R, and add configure bioconductor if you use it
- Setup information for the posit package manager mirror of bioconductor: here
- Enter R again and install the ir kernel and data science stack.
install.packages(c("tidyverse", "IRkernel"))
- Make sure the R kernel is installed in jupyter outside the renv as well (as per the directions earlier).
As long as you start your jupyter notebooks in the top level of the project folder then R kernels will respect your Renv.
Project Structure
project_repo_dir
├── .python-version
├── .gitignore
├── .renvignore
├── .Rprofile
├── renv.lock
├── requirements.txt
├── {python_notebook_names}_py.ipynb
├── {python_notebook_outdirs}_py
    ├── {python_notebook_names}_py.py
    ├── {python_notebook_names}_py.html
    └── {analysis_outputs}
├── {r_notebook_names}_r.ipynb
├── {r_notebook_outdirs}_r
    ├── {python_notebook_names}_r.r
    ├── {python_notebook_names}_r.html
    └── {analysis_outputs}
└── README.md
There is quite a bit going on here so I will elaborate:
.python-version: Records the local version of python in the project..gitignore: Records any files that should be ignored by git..renvignore: Records any files that should not be parsed byrenv..Rprofile: Project-specific configuration for R.renv.lock: Whererenvrecords the packages in the environment (including versions). Similar in concept to a Python requirements.txt.requirements.txt: List of Python packages installed in the environment.{python_notebook_names}_py.ipynb: Jupyter notebooks that use Python get named with "_py.ipynb" to make it clear they use Python.{python_notebook_outdirs}_py: Output folders for Python notebooks, each Python notebook gets an output folder named the same as the parent notebook.- Outputs from analysis go in here.
- I also like to include the notebook is plain text .py format so they can be run without Jupyter, and in .html format so they can be viewed by non-coders.
{r_notebook_names}_r.ipynb: Jupyter notebooks that use R get named with "_r.ipynb".{r_notebook_outdirs}_r: The same schme as{python_notebook_outdirs}.
- README.md: Summary of the project.
The companion github repository is here and has examples of all these files, as well as two example notebooks. I recommend checking them out.
Notes on .gitignore and .renvignore
By default renv will parse all files in your project to determine which
packages need to be tracked in the renv.lock. This can be problematic if you
have large files, including notebooks in the project folder.
One way around this is to add large files to .gitignore. Renv respects that as a list
of files and subdirectories not to parse. You'll notice this already will exist
in the ./renv/ subdirectory it creates your project-specific library in, to
avoid having git track all that. This probably isn't sufficient to avoid having
issues with it parsing notebooks, which you likely do want to track with git.
If you create an .renvignore in your project folder then Renv will use that
instead of .gitignore. I have been naming notebooks I write python in with
_py on the end so I can match them and output folders in .renvignore
easily. This is kind of clunky though.
In light of this, I set up my .gitignore with typical settings from jupyter
notebooks like this: .gitignore.
Ignoring the .ipynb_checkpoints and .virtual_documents folders.
For .renvignore, I create one that ignores all python-based notebooks. You may
want to tweak this to your liking: .renvignore.
You can get around the behavior of renv trying to parse large files by forcing
it to record all packages installed in an environment rather than just
ones used and their dependencies. This is demonstrated in the
R notebook example
with renv::snapshot(type = "all").
Restoring an Environment
If you need to restore the environment at a later date, or on a new machine,
you will need to enter the project folder; then set up a new virtualenv for
Pythonm install the packages from the requirements.txt, and install the
ipython kernel to your jupyter as you did during the initial set-up:
pyenv virtualenv {polyglot_project_name}  # This should already use the local python version from .python-version
pyenv activate {polyglot_project_name}
pip install -r requirements.txt
python -m ipykernel install --user --name={polyglot_project_name}
You'll then need to make sure you have R and renv installed before opening an R terminal and running:
renv::restore()
Notes on Alternative Setups
There is more than one way to do this. Poetry is one attractive option, but I decided against this as it's another dependency and this was already plenty complicated. I intended this as a minimal example of such a setup depending only on Python, R, virtualenvs (python, through pyenv), and renv(R). Some will prefer to opt for conda environments instead, since there is some support for R. Anaconda is pretty heavy and I'm not a fan, but miniconda is certainly an option. Mamba is a great option to manage conda environments which is much faster.
Then, there's the nuclear option of every environment being a standalone Docker or Podman container. This is attractive when you don't need to interact much with a host system, and therefore is a good fit for working in "the cloud." Of course, there are ways around that by mounting local storage inside your containers. You still need to document your environments to be able to recreate them.
Perhaps you vastly prefer R over Python, and would rather call Python from R
using reticulate. Reticulate actually
works with this set-up as well, you do need to force it to use the virtual
environment you created for your project with use_python().
If you have a strong preference for Python, then you might already use rpy2. This is similar in concept to reticulate, but I can't speak to how well it works with a setup like this, or if it would even be necessary. This does require you to call R from Python, rather than writing standalone R notebooks though.
There are probably improvements I'll add over time if I get around to it. However, this may give you some ideas of your own when it comes to living the polyglot data science/bioinformatics life.